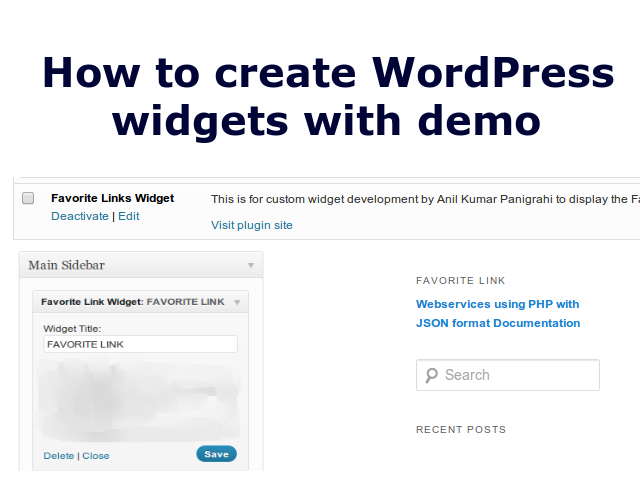
Hi friends, In this post I am going to explain about wordpress custom widget and how to create WordPress widgets using with demo. For widget development we have follow the functions as mentioned in below.
1. Widget Class name should be ended with ‘_Widget’ only.
2. Class should extends ‘wpal_Widget’
3. Have four functions
a) __construct()
b) widget($args,$instance)
c) form($instance)
d) update($new_instance,$old_instance)

How to create WordPress widgets with demo by Anil Kumar Panigrahi
2. Class should extends ‘wpal_Widget’
3. Have four functions
a) __construct()
b) widget($args,$instance)
c) form($instance)
d) update($new_instance,$old_instance)

How to create WordPress widgets with demo by Anil Kumar Panigrahi

|

|
Class
class contains the name with ‘__Widget’ and extends the ‘wpal_Widget’
1 2 | Class FL_Widget extends wpal_Widget{ } |
__construct()
__construct() is constructor for this class widget. This code will be run every time widget is loaded, when activated and updated.
1 2 3 4 5 6 7 8 | public function __construct(){ parent::__construct( 'fl_widget', // Base ID 'Favorite Link Widget', // Name array( 'description' => __( 'A Favorite Link Widget is developed by Anil Kumar Panigrahi', 'text_domain' ), ) // Args ); } |
widget($args,$instance)
widget($args,$instance) function contains the code that will be rendered to the sidebar when widget is added and that will be visible to wbsite visitors.
1 2 3 4 5 6 | public function widget($args,$instance){ $title = apply_filters( 'widget_title', $instance['title'] ); echo $args['before_widget']; echo __( 'Hello, World!', 'text_domain' ); echo $args['after_widget']; } |
form($instance)
form($instance) function contains the setting page on WordPress widget admin screen. That will be visible in the Appearance -> Widgets. This method called the
form and all controlls will appear when widget options are expanded
1 2 3 4 5 6 7 8 9 10 11 12 13 14 | public function form($instance){ if(isset($instance['title'])){ $title = $instance['title']; }else{ $title = __('New Widget Title','text_domain'); } ?> <p> <label for="<?php echo $this->get_field_name( 'title' ); ?>"><?php _e( 'Widget Title:' ); ?></label> <input class="widefat" id="<?php echo $this->get_field_id( 'title' ); ?>" name="<?php echo $this->get_field_name( 'title' ); ?>" type="text" value="<?php echo esc_attr( $title ); ?>" /> </p> <?php } |
update($new_instance,$old_instance)
update($new_instance,$old_instance) function called when click on “Save” option in the settings page in the admin secion/screen. And those details will save
into database by options.
1 2 3 4 5 | public function update($new_instance,$old_instance){ $instance = array(); $instance['title'] = ( ! empty( $new_instance['title'] ) ) ? strip_tags( $new_instance['title'] ) : ''; return $instance; } |


3 Comments
Execute PHP Code in Wordpress Widget - Anil Labs · September 16, 2013 at 2:05 pm
[…] friends, In the earlier post learned how to create wordpress widgets and in this post I will explain how to execute PHP code in your widgets in WordPress. Recently I […]
PHP code for Author Widget in Wordpress - Anil Labs · October 9, 2013 at 4:47 pm
[…] like explain how to write php code in author widget in wordpress blog. In earlier we learned about how to create WordPress widgets and execute PHP Code in WordPress Widget, this post is extended to earlier posts. PHP code for […]
Wordpress Favorite Links Widget 1.2 - Anil Labs · November 22, 2017 at 7:22 am
[…] the earlier post, we learned about how to create WordPress widget. This post explains extension for the previous post. In this widget, we can add multiple links as […]